Showing posts with label diy decorating. Show all posts

Wednesday, November 14, 2012

I'm coming back!

After a few months of very sporadic blogging, I am now in a place where I can spend some regular time sewing and blogging.  And I'm super excited about it!  I've got new fabrics coming in the mail this week and I am spending this afternoon cleaning all the Christmas presents off of my sewing table in anticipation of the work ahead.  So what have I been up to?  Well, mostly the average daily life of chasing around a 2 year old mixed in with the never-ending renovations on our home.  We are currently working on the bathroom that our son's room and the guest bedroom share.
Before
Sorry, the before picture is blurry and yes, that is very poor lighting.  It's a very small room and therefore difficult to photograph.  Unfortunately this is the only before I took as a part of a series of pictures I took to show my family our new house shortly after we moved in.  This picture actually makes it look better than it did, but believe me, the bathroom was in rough shape.  The toilet did not work.  The prior owners had had a leak in the toilet and it had damaged the linoleum flooring and the sub flooring beneath it.  The walls were not in great shape.  The light (not seen in the picture) is this awful brass contraption.  And the counter top was pink.  Yes, pink.  Apparently pink and brass were neutrals in the 1980s and this bathroom was full of them.  So in short the bathroom was failing us in the areas of both form and function.

So we did the following:
We ripped out the toilet, vanity, giant mirror, old trim, flooring, and sub flooring.  This step also included pulling out thousands of the staples that held the old sub floor down.  We also scraped out the old caulking around the tub/shower insert so that we could redo the caulking after painting.  Then we fixed the sub flooring, put down concrete backer board, laid tile, installed a new tolet, vanity, sink, and faucet, re-caulked around the tub, painted the medicine cabinet, replaced the medicine cabinet hardware, painted the walls, ceiling, trim, and door, replaced door knob and towel bars and toilet paper holder.  So here is where we are:
As you can see, we went with a dark grey ceramic tile.  This was our first time tiling, so we were very nervous!  We still need to hang the new mirror above the vanity, replace the light fixture, and replace the baseboard trim and door casings on the inside.

Originally the door, trim, and medicine cabinet were a dark brown wood veneer.  I have now painted the doors and trim in almost all of the house white.  I think that it helps to brighten things up.

We got our vanity at Lowes.  I love it, but it was not without its problems.  When we got it home and opened it up, there was no top!  It was supposed to be included and so we called and they finally tracked one down for us.  I have one DIY saying that I think is true for every project we do: "Nothing is ever going to be as simple as you think."  While it was not a major problem, little snags like that always delay things.
   
 We did not do a perfect job with the tiling, but I am proud of us for tackling it ourselves.  

 I should have put away the lime green kneeling pad that I use when I bathe my son.  It definitely clashes with the walls.  The color on the walls is "Happy Camper" by Behr and it's a nice kelly green sort of color.  I already had the shower curtain and liked it, so I pulled the colors for the room out of it.   

 I am a cheap-o on some things, so if I can repaint it instead of replacing it, I will!  So I took the medicine cabinet down, painted it, replaced the hardware and just hung it back up.  It's not the prettiest thing ever, but it coordinates with the rest of the room.

As you can see here we still need to replace the door casings (which I have already painted and are just waiting for a good weekend to be installed).  We did replace the electrical socket and light switches and covers.  I don't like the off white ones, so we have done this in every room.  I know, it seems like a lot of work and expense to replace something that functions, but I think they look so much cleaner in white than off-white.  Plus, I've gone to all the trouble to paint all the trim and doors in the house white, so I like for it to match instead of clash.  

Whew!  So we still have some more to do in this room and I will definitely share some pictures once we polish it off and consider it done.  Anyone else take on their first bathroom renovation lately? 

Thursday, March 15, 2012

It's Curtains for me!

FINALLY. But they're not done yet...
Last June we bought a fixer-upper.  A charming, 1980's neglected home.  In the 9 months that we have lived here, we have be slowly making progress on making our home our own and bringing it into the present.  We have replaced the carpet upstairs, painted ceilings, walls, and trim, purchased new appliances for the kitchen, put in a new furnace and air conditioning, painted the kitchen cabinets, changed out the kitchen hardware, and the list goes on.  when you have so many BIG things to do, sometimes the little things get put off or just seem to take forever.  Our curtains fall into that little category.


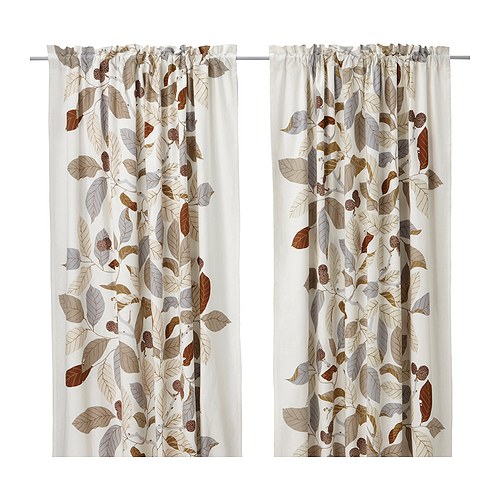
The living room is not quite complete yet.  so far we have painted the walls, ceiling, and trim, hung a few pictures, and replaced the hardware on the front door.  We still have to put in the laminate flooring and then we will eventually get around to installing some built-ins to store books and media.  For some time, though, I have been the look out for curtains.  When you are practically re-doing an entire house, you have a constant list of things to "be on the lookout" for.  Also, because we have so much to do, I have set some pretty strict budgets for things, and that can make it difficult to find items, sometimes most of the time.  I feel like I looked high and low for curtains.  I looked at Ikea, T.J. Maxx, Target, Walmart, World Market, Gabriel Brother's, Marc's and really couldn't find anything already made within my budget.  I really wanted to spend no more than $40 for all  four panels total, so $10 per panel.  I know, that is ridiculously low, but I just had a hard time pulling the trigger on something more expensive.  I liked these from Ikea in brown, but they were way over budget.  
 I also like these from World Market, but they were over budget as well.  

I briefly toyed with the idea of making them, but when I looked at fabric I struggled to find any that I liked that would be within my budget.  I liked this fabric from Dwell Studio that I saw at Joanne's. But it was also over budget.


Another struggle I had was with trying to find something that would coordinate with the rest of the living room.  The walls are a soft, dove-gray (Bay Waves by Valspar).  I have a rug that I love which features a large, modern pattern of berries and branches in a dark blue/green, chocolate brown, khaki, and cream color scheme.  I knew I wanted to keep the rug so I felt the need to stay in the same color scheme, especially if I wanted a curtain with a pattern.  I very much love rooms with a mixture of patterns, but the mixture has to be done well.  It has to strike this balance of not being to matchy-matchy and not clashing completely.  It's a fine balance.


I think I finally was able to find something I like in the curtains that I found at Target.  They were about $17 a panel, and I really liked them, so my husband (eager to stop having to talk about the curtains) told me to forget about the budget and put them into the cart.  When we got home, I took them out of the package and delightfully discovered that they were extremely wide in comparison to out windows.  I am planning on replacing the wooden blinds with cream colored Roman shades because I love the look of long panels paired with a crisp Roman shade in the middle.  Kinda like this:
I feel really bad, but I cannot for the life of me remember where this photo is from.  So if this is your photo, let me know so that I can give proper credit. I think maybe it was on hgtv.com...
So the Roman shades will be coming soon, now that I finally have the curtains to know how to coordinate the colors.  Since we are planning on putting a Roman shade in the middle, I wanted to hang the curtains a bit wider than the windows so that they do not cover too much of the sunlight.  When I hung one panel up I felt like it was way too wide for what I wanted, especially given the amount of space between the two windows, so I decided to cut the panel in half, thus creating two panels out of one.  So I kept two panels, cut each in half and hemmed the raw edge.  Since I only needed two panels instead of 4, the total cost for the panels for the living room was about $34.  Completely under budget.  I know that not everyone would necessarily like their panels to be thinner, but it works for us in our living room.  And believe it or not, when the panels are closed, they do completely cover the windows.  Now I just need to keep an eye out for those Roman shades.